Email Management
Step-by-Step Guide to Automating Gmail Filters
Learn how to create, edit, and apply Gmail filters, use Boolean operators, and combine them with automated cleanup to keep your inbox organized.
Step-by-Step Guide to Automating Gmail Filters
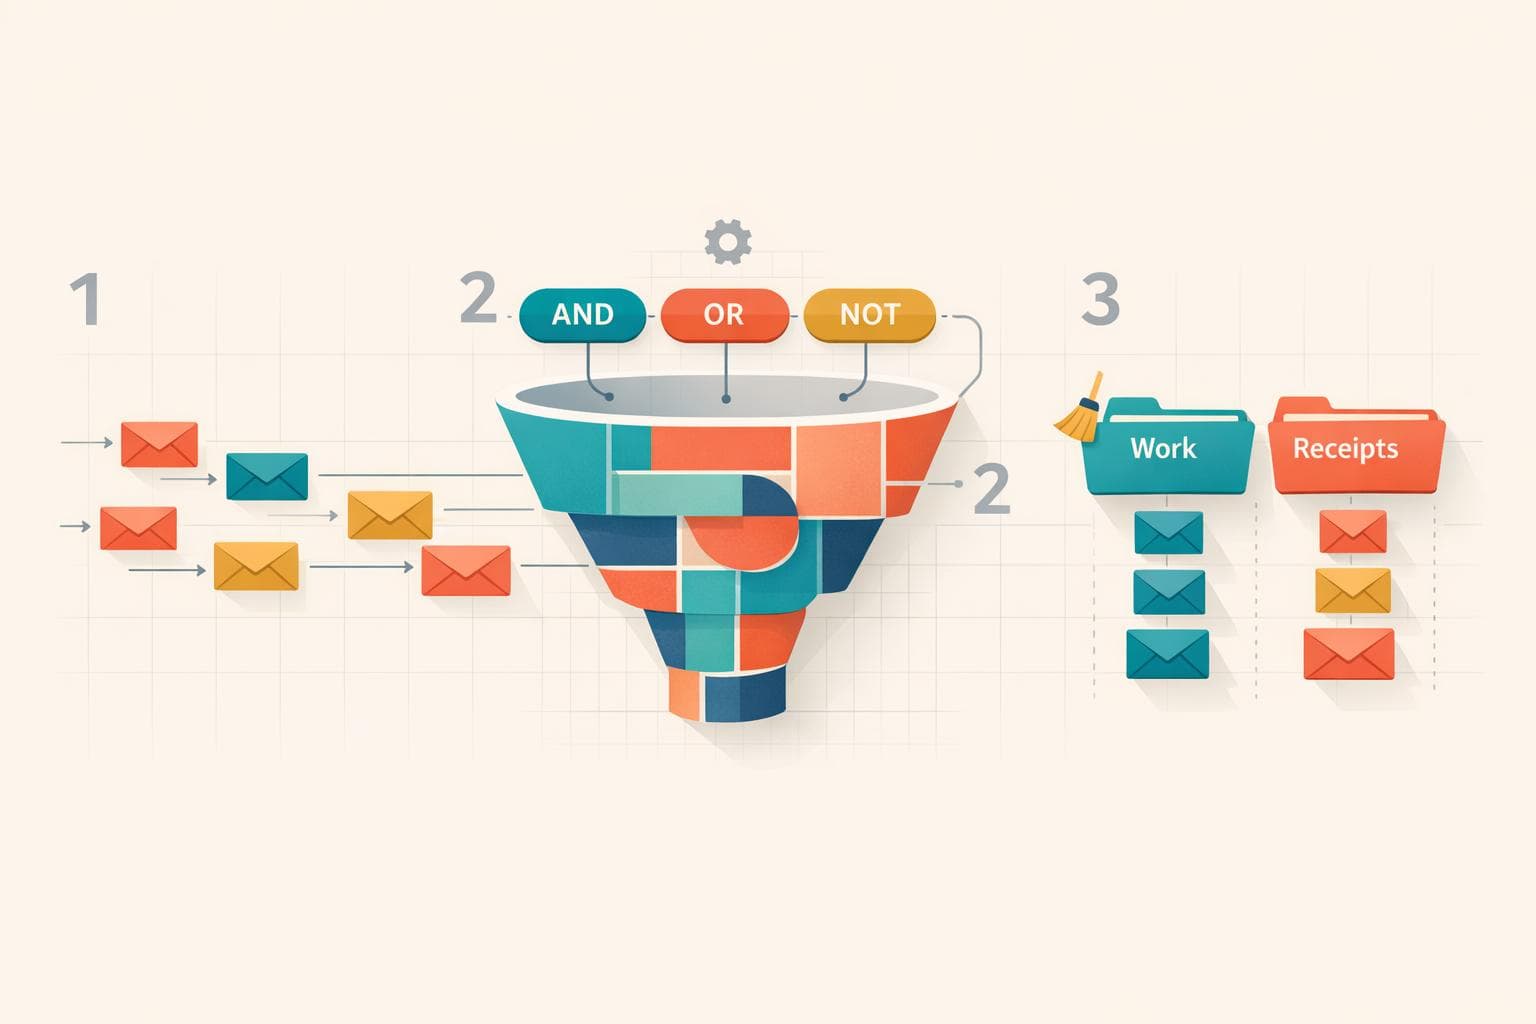
Automating Gmail filters can save you time and keep your inbox organized. Here's what you need to know:
- What Filters Do: Gmail filters automatically sort, label, archive, delete, or forward emails based on rules you set.
- Why Use Filters: They reduce clutter and help you focus on important emails by handling repetitive tasks for you.
- How to Create Filters:
- Open the filter tool via the search bar, email options, or settings.
- Define criteria like sender, keywords, or file size.
- Choose actions (e.g., archive, label, delete).
- Apply filters to existing emails for instant cleanup.
- Advanced Tips: Use Boolean operators (e.g., OR, NOT) for complex rules or filter by unread status, file size, or domain.
- Managing Filters: Edit, delete, or export filters via the "Filters and Blocked Addresses" tab in Gmail settings.
For long-term cleanup, tools like MailSweeper can automatically delete older emails labeled as less important, helping you fix Gmail storage issues and maintain a tidy inbox.
Automate Your Gmail: Step-by-Step Filter Creation Guide
sbb-itb-34b9fd2
How to Set Up Gmail Filters
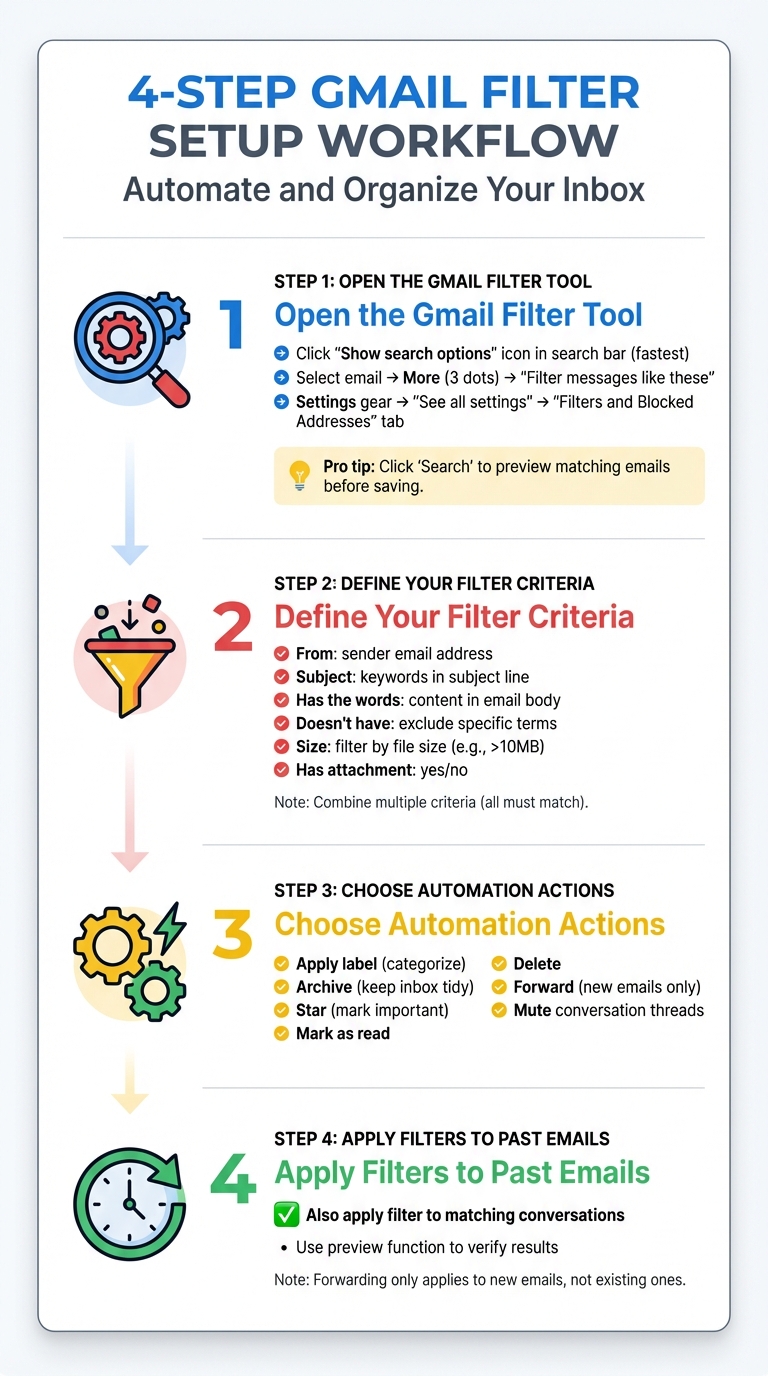
How to Create Gmail Filters in 4 Steps
Step 1: Open the Gmail Filter Tool
There are several ways to access Gmail's filter tool: through the search options icon, an email's options menu, or by navigating to Settings > Filters and Blocked Addresses.
The fastest way? Click the "Show search options" icon in the search bar at the top of your Gmail screen. This opens a panel where you can set up your filter rules.
If you want to create a filter based on an email you’ve already received, select that email, click the "More" icon (three vertical dots), and choose "Filter messages like these." This automatically fills in the sender's address. Alternatively, head to Settings (the gear icon), select "See all settings," and go to the "Filters and Blocked Addresses" tab to manage or create filters.
Before finalizing a filter, click "Search" to preview which emails match your criteria. This helps you confirm that your filter will work as intended before saving it. Once the tool is open, you’re ready to define your filter rules.
Step 2: Define Your Filter Criteria
Filters can be based on sender, keywords in the subject or email body, file size, or attachment status. You can combine multiple criteria, ensuring emails must meet all conditions before the filter applies.
For example, to filter emails from a specific sender, enter their email address in the "From" field. To filter by keywords, use the "Subject" field for terms in the subject line or the "Has the words" field for content within the email body. You can exclude emails by adding terms to the "Doesn't have" field. For storage management, set size-based rules - like automatically archiving or deleting emails larger than 10MB. You can also filter emails with attachments, which is especially helpful for sorting documents.
Step 3: Choose Automation Actions
Decide what Gmail should do with emails that match your filter. Options include applying labels, archiving, starring, marking as read, deleting, or forwarding. Keep in mind that forwarding only works for new emails.
For better organization, you can assign labels to categorize emails or archive them to keep your inbox tidy while retaining access. If certain messages are important, you can star them or mark them as read automatically. Other options include deleting emails immediately or forwarding them to another email address. Filters can also mute conversation threads, sending them straight to the archive without cluttering your inbox. Once you've chosen your actions, you can apply these settings to existing emails for an instant cleanup.
Step 4: Apply Filters to Past Emails
To organize emails already in your inbox, check the "Also apply filter to matching conversations" box. Use the preview function to see which emails will be affected.
This feature is perfect for clearing out a messy inbox. By checking the box, Gmail will automatically apply the filter to all existing emails that match your criteria. The preview function helps you double-check the results before making any changes. Keep in mind that forwarding will only apply to new emails, not past ones.
How to Manage and Edit Gmail Filters
Finding Your Filters Management Panel
The Filters and Blocked Addresses tab is where you handle everything related to filter management. To access it, click the Settings gear icon in the top-right corner of Gmail, choose See all settings, and then navigate to the Filters and Blocked Addresses tab. Here, you'll see a list of all your active filters.
This section allows you to create new filters, tweak existing ones, delete filters you no longer need, or even export and import filter configurations as .xml files. If you've used filters to archive emails, you can find those messages in the All Mail folder. Once you're familiar with this panel, you can move on to modifying or removing filters to better organize your inbox.
How to Edit or Delete Filters
Keeping your filters updated is essential for maintaining an efficient inbox and ensuring your emails are sorted correctly.
To edit a filter, locate it in the list and click Edit. You can adjust the search criteria or actions, such as applying labels or changing the "Skip the Inbox" setting. After making changes, click Update filter. If you want the updated filter to apply to existing emails, check the box for "Also apply filter to matching conversations."
To delete a filter, simply click Delete next to the filter you want to remove and confirm by clicking OK. Remember, deleting a filter only stops it from processing future emails - it doesn't reverse actions already applied, like labeling or archiving. For bulk deletions, select multiple filters and click Delete.
Note that Gmail's mobile app doesn’t support filter management. However, you can switch your mobile browser to Desktop Mode to access these settings. If you think you might need a filter again later, export it as an .xml file before deleting it. This way, you can re-import the rule without recreating it from scratch.
Advanced Gmail Filter Techniques
Using Boolean Operators in Filters
Gmail filters can do a lot more when you incorporate Boolean operators to combine conditions. By default, Gmail applies "AND" logic - meaning if you specify both "From" and "Subject" fields, the filter only activates when both are true. But with operators like OR, NOT, and parentheses, you can create much more refined filters.
The OR operator (always capitalized) allows a filter to trigger if any of the listed conditions are met. For instance, instead of setting up separate filters for multiple newsletters, you can use this:
from:(news@company1.com OR news@company2.com OR news@company3.com)
Similarly, the NOT operator, represented by the minus sign (-), can exclude specific terms or senders. For example:
from:*@company.com -from:hr@company.com
This will include all emails from the company except those sent by HR.
Parentheses are handy for grouping terms and controlling the order of operations. For example:
from:(amy OR david) subject:meeting
This filter will capture emails from either Amy or David that include "meeting" in the subject line. If you’re working with complex combinations of criteria, you can enter the entire Boolean query into the "Has the words" field using prefixes like from:, to:, and subject:. Beyond Boolean logic, Gmail also allows filtering based on unread status and sender variations.
Filtering by Unread Status and Multiple Senders
To manage unread emails, use the is:unread operator. This is particularly useful for automatically labeling or archiving new unread messages that meet specific conditions. However, remember that Gmail filters only work on incoming emails - since "unread" is a temporary state, a filter won’t remove a label after you’ve read the email.
When dealing with multiple senders, you can consolidate them into one filter using:
from:(sender1@email.com OR sender2@email.com)
If you want to filter emails from an entire domain, the asterisk (*) acts as a wildcard. For example:
from:*@amazon.com
This will capture all emails from any Amazon subdomain. You can also filter by file size using operators like larger:10M, which helps you label or organize emails with attachments exceeding 10 megabytes. And if you want to target marketing emails, try a filter like:
unsubscribe OR "view in browser" OR "opt out"
This will catch most promotional messages and help you keep your inbox clutter-free.
Using MailSweeper for Automated Email Cleanup
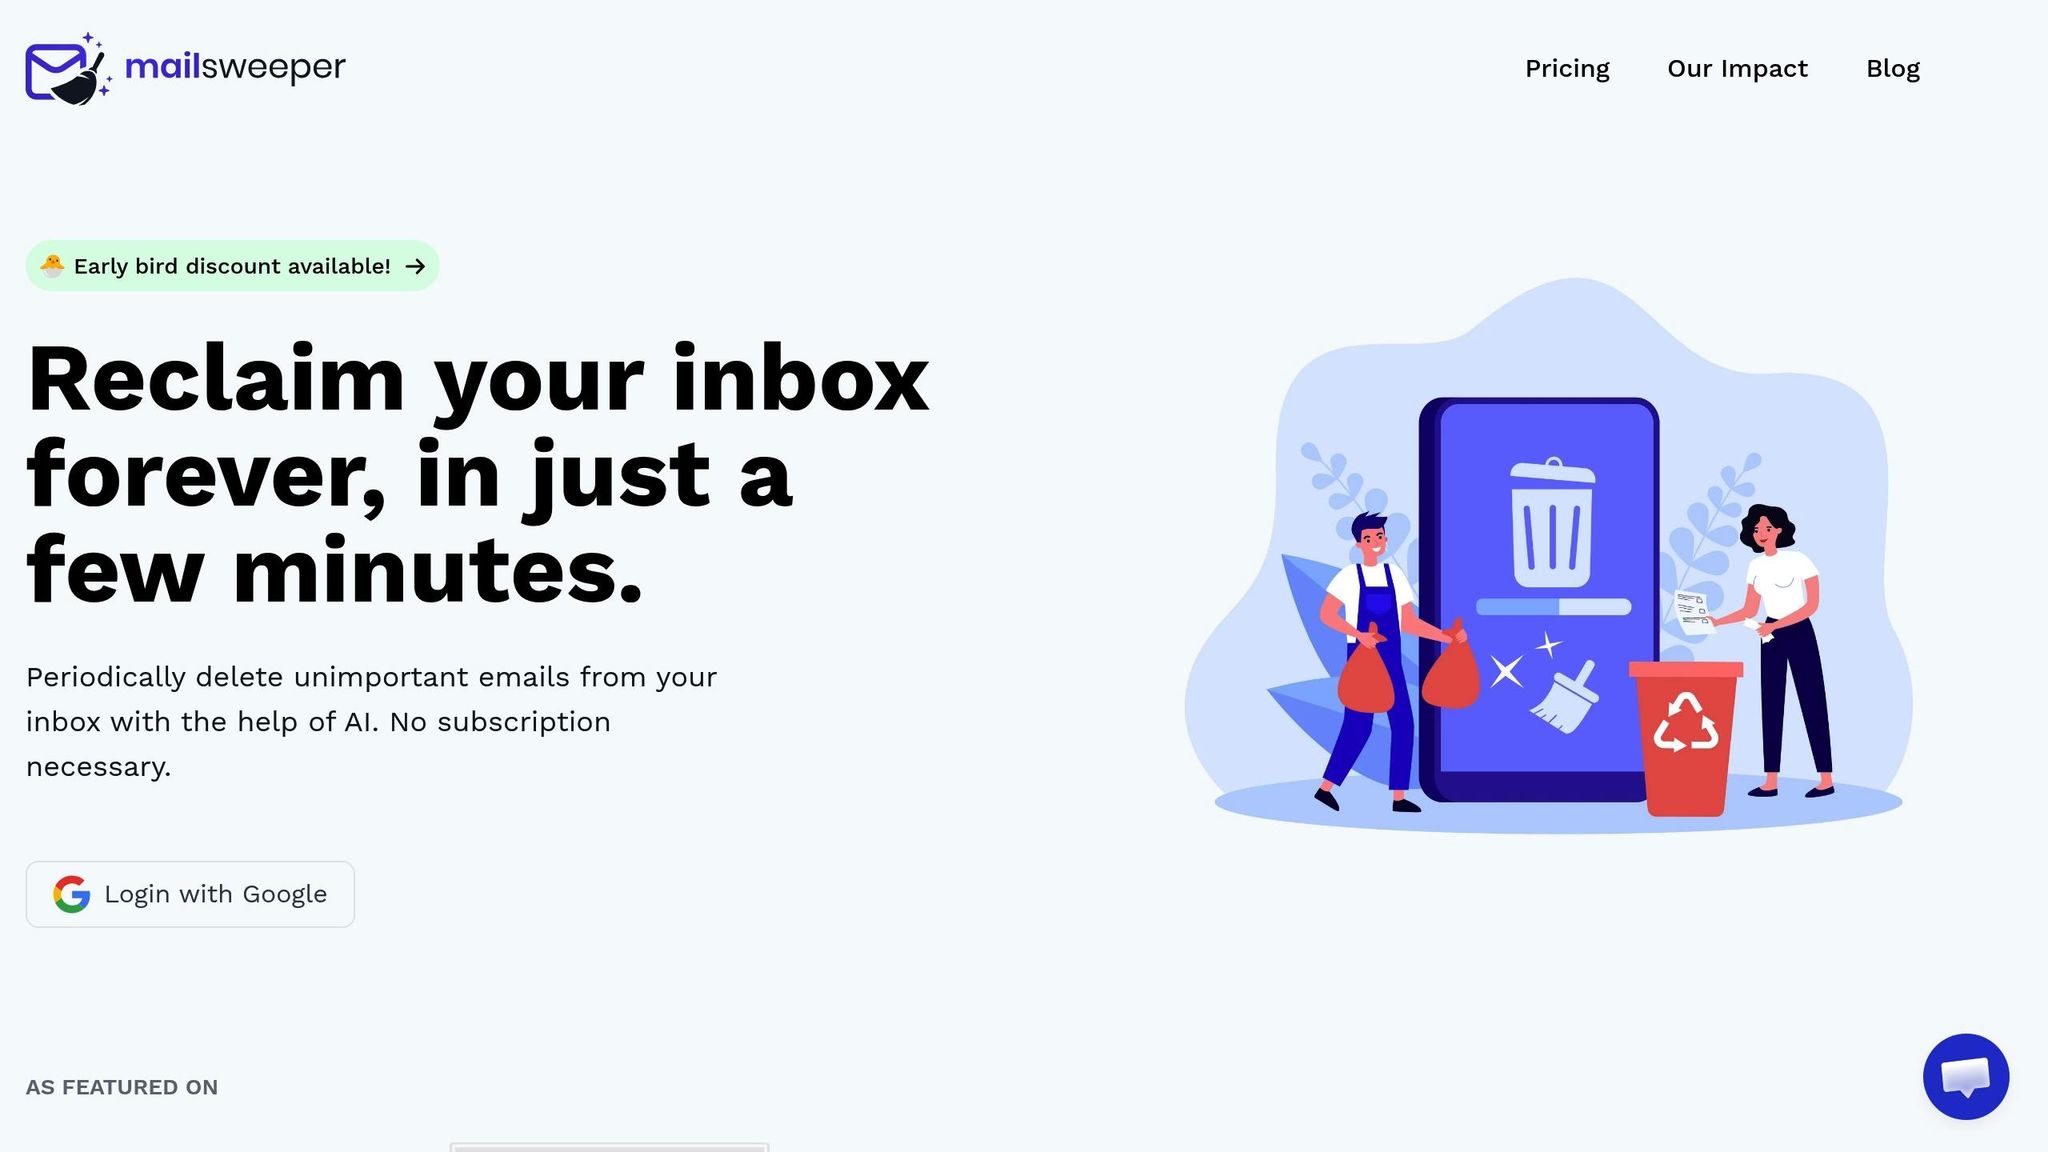
While Gmail filters are great for organizing incoming emails, MailSweeper steps in to handle the hidden cost of email that builds up over time, keeping your inbox tidy and efficient.
How the Dustpan Label Works
Gmail filters sort emails as they arrive, but MailSweeper takes it further by addressing older emails you no longer need. When you install MailSweeper, it adds a label called "🧹Dustpan" to your Gmail account. Using AI and your preferences, MailSweeper tags less important emails with this label. Then, based on your choice of a 30- or 90-day cycle, it deletes these emails automatically, keeping your inbox clutter-free.
So far, MailSweeper has cleared over 3.3 million emails, saving users a combined 245 GB of storage space. It’s designed with safety in mind - emails marked as starred, important, or in your primary inbox are never touched. Plus, you can cancel deletion by simply removing the "Dustpan" label before the next cleanup cycle. These features make it a powerful tool for better inbox management.
Benefits of Using MailSweeper with Gmail
MailSweeper works alongside Gmail's filters to tackle the gradual buildup of old, unnecessary emails. This helps users stay within Gmail's 15 GB free storage limit without manual effort. The service is available through a one-time payment - $16 for the Early Bird plan or $20 for the Personal plan - with no recurring fees.
On top of that, MailSweeper is CASA certified, ensuring your email data remains private - it’s never read, stored, or sold. The cleanup process even has an eco-friendly impact, reducing carbon emissions by 111.61 kgCO2e.
Conclusion
Gmail Filter Automation Summary
Once you get the hang of it, setting up Gmail filters is a breeze. Open the filter tool through the search box, define your criteria - like sender, subject, or keywords - and then decide what happens next: label, archive, or delete. Don’t forget to use the "Also apply filter to matching conversations" option to instantly organize existing emails that meet your criteria.
To keep things running smoothly, review your filters regularly in the "Filters and Blocked Addresses" tab. Need a backup or want to transfer filters to another account? Export them as an .xml file. These simple steps can transform your inbox into a more streamlined and manageable space.
Combine these filters with regular inbox cleanup for maximum efficiency.
How MailSweeper Improves Your Email Workflow
While Gmail filters manage new emails, MailSweeper tackles the clutter that builds up over time. Its "🧹Dustpan" label gathers less critical emails and deletes them automatically after 30 or 90 days. This helps keep your inbox within Gmail's 15GB free storage limit. MailSweeper has already cleaned up millions of emails, freeing up hundreds of gigabytes of storage.
With a one-time payment starting at $16 for the Early Bird plan, there are no recurring charges. Plus, CASA certification means your email data stays private - it’s never read, stored, or sold. By automating both incoming email organization and periodic cleanup, you can enjoy a consistently tidy inbox and a stress-free email experience.
FAQs
How do I check if my Gmail filters are working properly?
After setting up a Gmail filter, it’s a good idea to test it out to make sure it’s doing what you intended. Use the same search criteria you set for the filter in Gmail's search bar. This will help you confirm that the right emails are being identified. Check if emails are being labeled, moved, or deleted as per your filter settings.
Take a moment to review the folders or labels where filtered emails are being sent. This ensures everything is being sorted as planned. It’s also wise to occasionally check your Spam or Trash folders to make sure no important messages are being filtered out by mistake. If something seems off, you can always tweak or disable the filter to fix the issue.
For an even more efficient inbox, you might want to try tools like MailSweeper. It’s designed to automatically clean out unimportant emails, helping you save time and keep your inbox clutter-free.
Can I use Gmail filters to organize emails I’ve already received?
Yes, you can apply Gmail filters to emails you’ve already received. After setting up a filter with your chosen criteria, simply select the option to apply it to existing matching emails. This makes it easier to organize older messages and tidy up your inbox efficiently.
How does MailSweeper enhance Gmail filters?
MailSweeper works hand-in-hand with Gmail filters to spot and clean up unimportant emails automatically. By cutting down on inbox clutter, it helps you save time, reduce email storage expenses, and keep your inbox tidy without lifting a finger.
One standout feature, The Dustpan, collects less important emails while leaving your crucial or starred messages untouched. Emails in the Dustpan are then automatically deleted based on the schedule you set - usually after 30 or 90 days. This hands-off approach ensures your inbox stays organized with minimal effort.
More free Gmail tools.
Pair these together for a full inbox reset.
Bulk Unsubscribe from Gmail
See the senders flooding your inbox, ranked by volume — your shortlist for unsubscribes.
Open toolMass Delete Gmail Emails
Build a deletion plan by sender, date, label, or all-unread — with the exact Gmail search to run.
Open toolFind Large Emails in Gmail
Pick a size and we build the exact Gmail search to find your biggest emails — then open it in one click.
Open toolGmail Storage Cleanup
Move the slider to your current Gmail usage to see exactly what to delete to free space.
Open toolInbox Zero Score
Rate your inbox health on a 0–100 scale and see the weekly hours your inbox is costing you.
Open tool