Email Management
Checklist for Setting Up Gmail Filters to Save Space
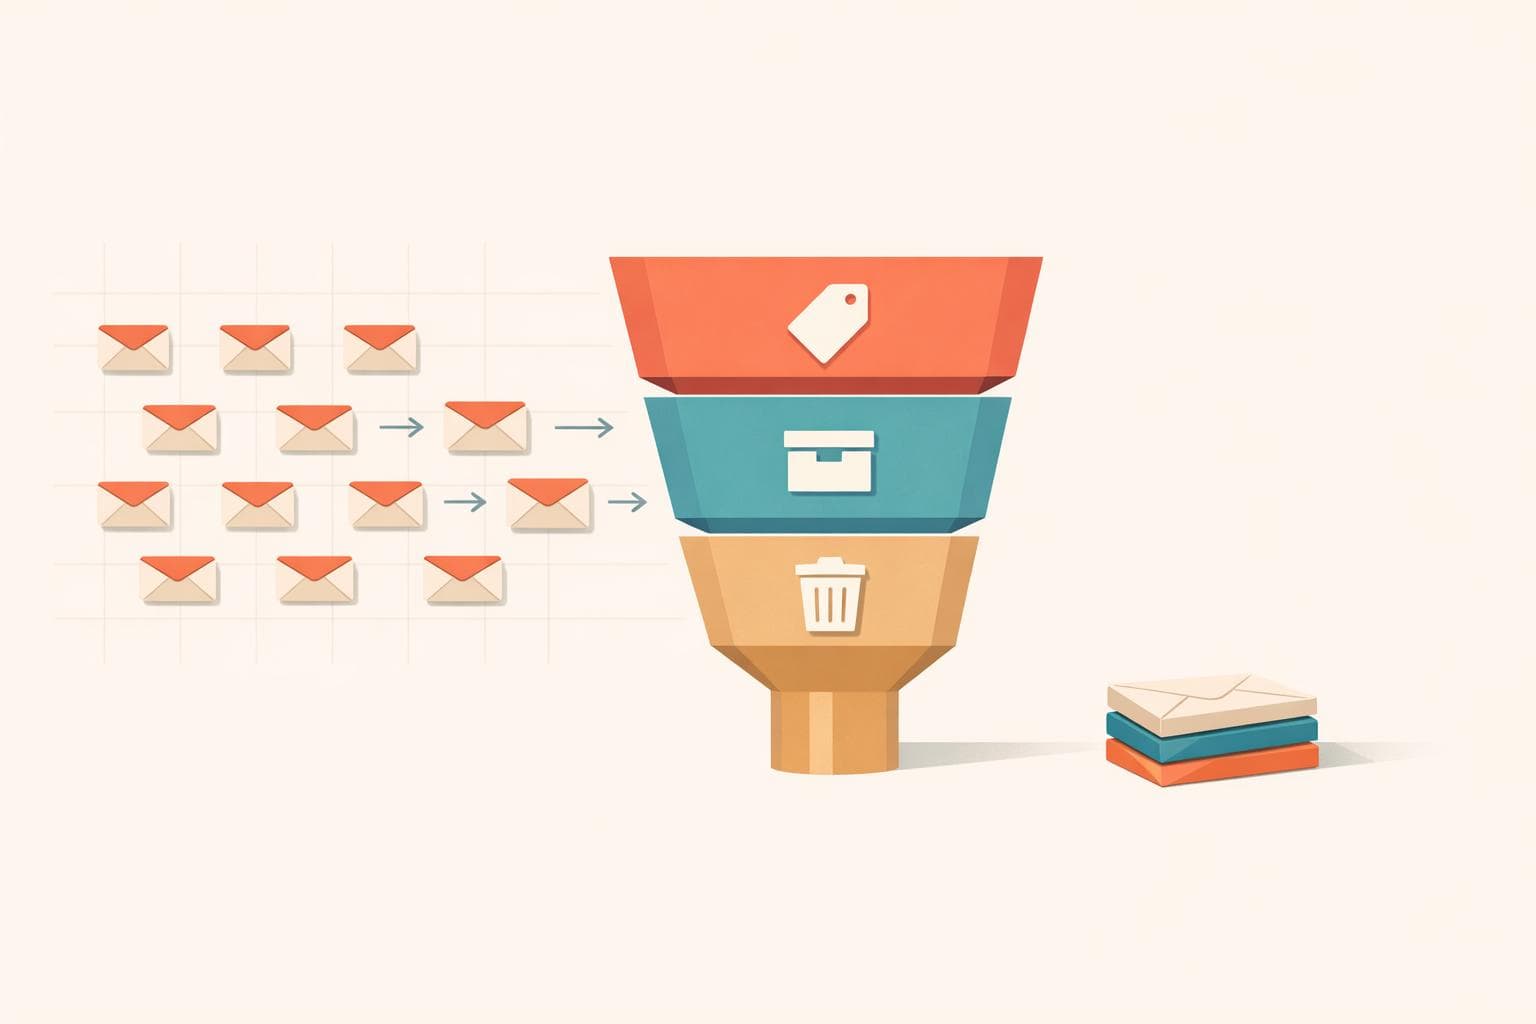
Create Gmail filters to label, archive, or delete large and low-value emails and combine filters with automation to free storage.
Checklist for Setting Up Gmail Filters to Save Space
If your Gmail inbox feels cluttered and storage is running low, filters can help. By automating actions like deleting, archiving, or labeling emails, you can quickly free up space and stay organized. Here's how to get started:
- Check Your Storage Usage: Gmail's 15 GB is shared with Google Drive and Photos. Identify large attachments and unnecessary emails consuming storage.
- Create Labels: Use labels like "Large Attachments" or "Newsletters" to organize emails for easy cleanup.
- Set Up Filters: Define criteria (e.g., sender, size, keywords) to automatically delete, archive, or label emails. For example, target emails over 10 MB or newsletters with "unsubscribe" in the text.
- Manage Filters Regularly: Edit, update, or remove filters as your needs change. Combine rules for efficiency using OR logic.
For extra help, tools like MailSweeper can automate email management further by identifying and removing low-priority emails. Combining filters with such tools ensures a clean inbox and optimized storage.
Step-by-Step Guide to Setting Up Gmail Filters for Storage Management
How to use Gmail Filters & Rules - Tutorial for Beginners
sbb-itb-34b9fd2
Getting Ready to Set Up Gmail Filters
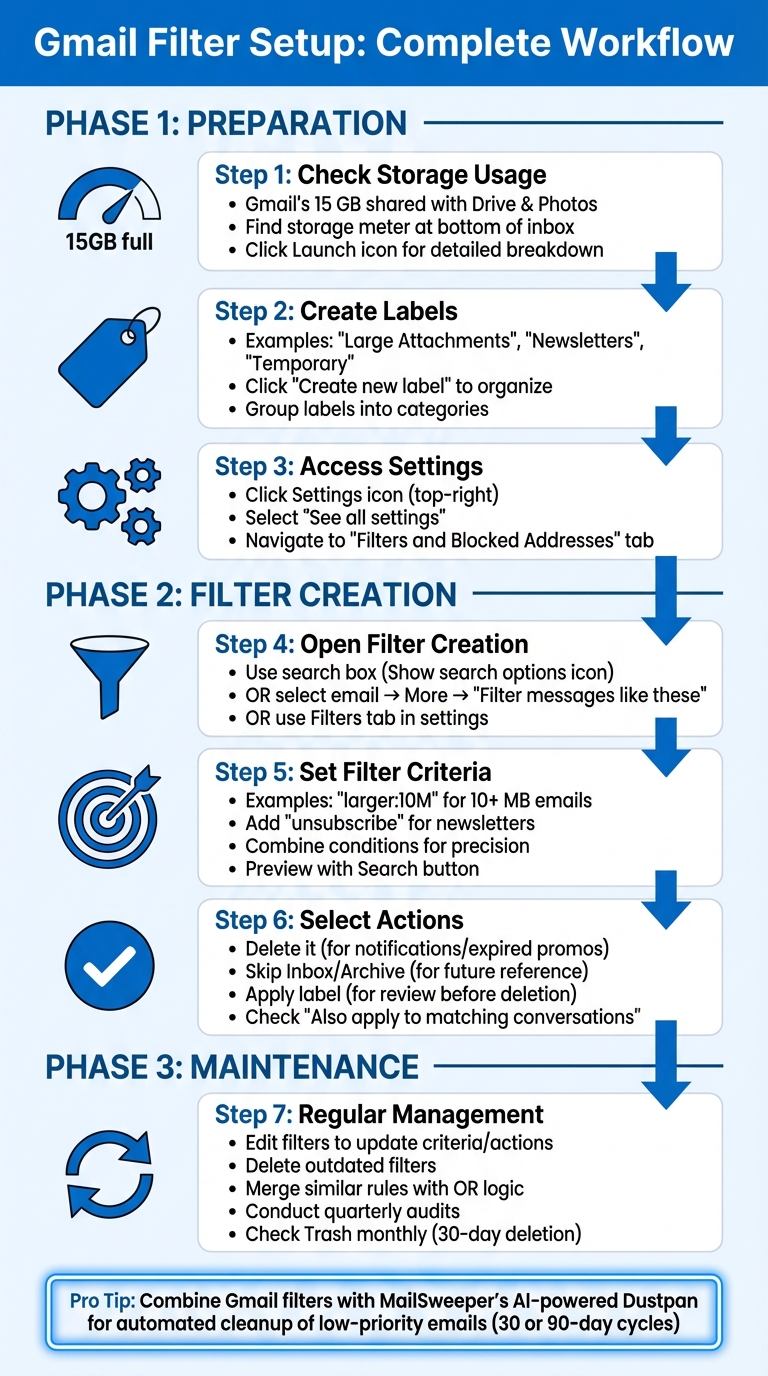
Before diving into Gmail filters, it’s a good idea to check how much storage you’re using and organize your inbox with labels. This will help you target emails that are taking up unnecessary space. Follow the steps below to get started.
Check Your Gmail Storage Usage
First, take a look at your current storage usage. If you're using Gmail on a desktop, scroll to the bottom of your inbox to find the storage meter. Gmail’s 15 GB of free storage is shared across Gmail, Google Drive, and Google Photos, so a cluttered inbox can impact all these services.
For a detailed breakdown, click the Launch icon next to the storage meter. This will show how much space each service is using. If Gmail is eating up a significant chunk, it’s time to take action. Look for patterns, like emails with large attachments or outdated promotional messages, that could be hogging your storage.
Create Labels for Better Organization
Gmail’s label system allows you to tag emails with as many labels as you want. Before setting up filters, create labels that align with your cleanup goals. For example, labels like "Large Attachments" or "Newsletters" can help you quickly identify emails that take up space.
To create a label, click "Create new label," enter a name, and hit "Create." You can also organize labels into categories - for instance, placing "Shopping" and "Tech News" under a main label like "Subscriptions." If you plan to periodically delete certain emails, consider labels like "Temporary" or "Old Notifications" to make bulk deletions easier.
Access Gmail Settings on Desktop
You’ll need to use a desktop browser to manage filters. Once on your desktop, click the Settings (gear) icon in the top-right corner, then select "See all settings" to open the full settings menu.
Navigate to the Filters and Blocked Addresses tab to view or manage your filters. To create a new filter, click the Show search options icon (three horizontal lines) in the search bar at the top of your inbox. This menu also allows you to export or import filters, giving you more control over your email management.
How to Create Gmail Filters
Once you've organized your labels and checked your Gmail storage, the next step is setting up filters to automatically manage your incoming emails. Gmail offers three ways to access the filter creation settings, each suited to different situations.
Open Gmail's Filter Creation Settings
Start by using the search box at the top of your inbox. Click the Show search options icon (the small down arrow) to bring up the filter creation window. Here, you can define your criteria and click Create filter to proceed.
If you want to base a filter on an existing email, select the email, click the More icon (three vertical dots), and choose Filter messages like these. This will auto-fill the criteria based on the selected email.
Prefer working through the settings menu? Head to the Filters and Blocked Addresses tab under Gmail settings to create a new filter from there.
Once you've accessed the filter creation options, it's time to define your criteria.
Set Your Filter Criteria
Specify the emails your filter should target by defining criteria like sender addresses, subject lines, keywords, or even email size. For instance:
- Use the "Has the words" field to type larger:10M to catch emails with attachments over 10 MB.
- Add "unsubscribe" as a keyword to identify newsletters or promotional emails.
- Combine multiple conditions, like a specific sender and emails larger than 5 MB, for more precise targeting.
Before finalizing, click the Search button to preview which emails match your criteria. This step helps ensure important emails aren’t accidentally included.
Select Actions to Save Storage
Once your criteria are set, choose actions that help manage your storage effectively:
- Delete it: Automatically sends emails to the Trash. This is perfect for high-volume notifications or outdated promotional emails.
- Skip the Inbox (Archive): Moves emails out of your primary inbox but keeps them accessible for future reference.
- Apply the label: Tags emails for easier organization. You can review these labeled emails later and decide whether to delete them.
If you want the filter to apply to existing emails, check the box for "Also apply filter to matching conversations". This extends the rule to your current emails, not just new ones, helping you clean up storage immediately. Finally, click Create filter to activate your rule.
| Action | Best Use Case |
|---|---|
| Delete it | For emails like daily notifications or expired promotions that you don’t need |
| Skip the Inbox (Archive) | For emails you might revisit later but don’t want cluttering your inbox |
| Apply the label | For emails you want to organize and review before deciding to delete |
Managing Your Gmail Filters
Filters are not a one-and-done solution. Your email habits evolve, projects wrap up, and new subscriptions pile in. That’s why regular upkeep is essential to keep your filters working effectively - preventing clutter while ensuring important emails don’t get lost. Once your filters are in place, take time to refine and review them periodically to maintain a well-organized inbox.
Edit or Delete Filters
To update or remove filters, head back to Gmail’s settings menu and open the "Filters and Blocked Addresses" tab. From there:
- Click "Edit" next to a filter to tweak its criteria or actions. For example, you might switch "Skip the Inbox (Archive it)" to "Delete it" for newsletters you no longer read. Always preview changes to avoid misfiltration.
- Use the "Also apply filter to matching conversations" option to apply updates to existing emails instantly.
- To delete a filter, hit "Delete" and confirm. If you're removing multiple filters, consider using Gmail’s "Export" feature to back them up as an XML file before proceeding.
Pro Tip: Simplify filter management by merging similar rules with OR logic. For instance, use from:(@deals.com OR @promos.com) to consolidate filters targeting promotional emails.
Once updates are made, keep track of their performance to ensure they’re still meeting your needs.
Review Filter Performance
After updating your filters, it’s important to verify they’re still achieving your inbox-cleaning goals. Schedule quarterly audits to identify outdated filters tied to completed projects, obsolete email addresses, or canceled subscriptions.
"Be sure to conduct a regular review of your team's rules every quarter. Update rules as needs change and the team evolves, and ensure there are no obvious rule conflicts." – Cody Duval, Founder and CEO of Keeping
In addition to quarterly reviews, check your Trash folder monthly to recover any emails that may have been mistakenly deleted - Gmail permanently removes them after 30 days. While reviewing, glance at your Gmail storage meter to confirm your filters are effectively reducing clutter and freeing up space.
Using MailSweeper to Automate Email Cleanup
Setting up Gmail filters can be a tedious process, requiring manual tweaks for every newsletter, notification, or promotional email. MailSweeper simplifies this by using AI to automate the cleanup process. Instead of relying solely on manually created filters, MailSweeper learns to identify unimportant emails and manages them for you. This automated system works alongside your existing filters, handling bulk clutter without constant adjustments.
How the Dustpan Works
When you install MailSweeper, it adds a "Dustpan" label to your Gmail account. This label automatically collects emails that are deemed unimportant, while keeping your Primary tab, starred emails, and flagged messages untouched.
The Dustpan operates on a cleanup cycle, permanently deleting emails after either 30 or 90 days, depending on your preference. If you want extra time to review the Dustpan for any miscategorized emails, the 90-day option provides a longer buffer. This gives you three months to double-check before anything is permanently removed.
By combining this automated cleanup with your existing folder and filter settings, MailSweeper reduces the time and effort needed to manage your inbox.
Combining MailSweeper with Gmail Filters
Pairing MailSweeper with your Gmail filters creates a powerful two-layer system for managing your inbox. Your filters can handle specific tasks, such as sorting client emails into project folders or sending receipts to your accounting label. Meanwhile, MailSweeper tackles the high-volume, less important emails that would otherwise require countless individual filters.
To make the most of both tools, you can set up a Gmail filter to label certain low-priority emails as "Dustpan" and archive them. From there, MailSweeper takes over, automatically deleting these emails based on your chosen timeframe. This approach not only streamlines your inbox but also saves you from the hassle of constant manual adjustments.
Wrapping It All Up
Gmail filters are a handy way to automate tasks like sorting, archiving, or deleting emails. They’re perfect for managing high-volume senders, large attachments, or promotional messages - helping you clear up storage without combing through every email yourself. The trick is to set up precise filter rules and regularly review them to ensure they align with your current email habits.
MailSweeper's AI-powered Dustpan takes cleanup to the next level by automatically spotting and dealing with unimportant emails. When you combine Gmail filters with MailSweeper, you get a powerful two-layer system: filters handle rule-based tasks like organizing client emails or saving receipts, while MailSweeper steps in to tackle those ever-changing, low-priority emails that are too dynamic for static rules.
Together, these tools create a streamlined email management system. This approach reduces your workload and ensures your inbox and storage space are focused on what truly matters. Start with these strategies and let MailSweeper handle the ongoing cleanup for you.
FAQs
How can I find emails taking up the most space in Gmail?
To find emails taking up the most storage in Gmail, you can use search operators such as larger:10M to locate emails that are over 10 MB. Gmail also provides a storage counter, or you can check tools like Google One to review how your storage is being used. After identifying these large emails, you can delete or archive them to free up space and keep your inbox more organized.
How can I create Gmail filters to manage storage effectively?
If your Gmail storage is filling up, one of the best ways to free up space is by creating filters to target emails that take up the most room or that you no longer need. Start by using search operators like larger:10M to find emails with large attachments. Want to narrow it down further? Combine multiple criteria, such as has:attachment larger:5M older_than:1y, to locate older emails with bulky attachments that are prime candidates for deletion.
Another smart tactic is to set up filters for specific types of emails. For instance, you can target messages from certain senders, newsletters, or promotional emails. These filters can automatically archive, delete, or label less important emails, helping you keep your inbox tidy. Just make sure to test any new filters first to confirm they’re working as intended before applying them across the board.
If you’re looking for an automated solution, tools like MailSweeper can make inbox management a breeze. These tools can quickly identify and clean up unnecessary emails, saving you both time and storage space.
How does MailSweeper work with Gmail filters to reduce email clutter?
MailSweeper takes Gmail filters up a notch by introducing AI-driven automation to simplify email management. While Gmail's built-in filters allow you to sort, archive, or delete emails based on criteria like sender or keywords, MailSweeper adds a game-changing feature called the "Dustpan." This tool automatically gathers low-priority emails, leaving out those marked as important or starred.
What makes it even better? MailSweeper performs scheduled cleanups, deleting older emails in the Dustpan according to your preferences - whether that's after 30 days, 90 days, or another timeframe. This hands-free process helps declutter your inbox and free up storage space. By pairing Gmail's static filters with dynamic automation, MailSweeper keeps your inbox tidy and organized without the extra effort.
More free Gmail tools.
Pair these together for a full inbox reset.
Bulk Unsubscribe from Gmail
See the senders flooding your inbox, ranked by volume — your shortlist for unsubscribes.
Open toolMass Delete Gmail Emails
Build a deletion plan by sender, date, label, or all-unread — with the exact Gmail search to run.
Open toolFind Large Emails in Gmail
Pick a size and we build the exact Gmail search to find your biggest emails — then open it in one click.
Open toolGmail Storage Cleanup
Move the slider to your current Gmail usage to see exactly what to delete to free space.
Open toolInbox Zero Score
Rate your inbox health on a 0–100 scale and see the weekly hours your inbox is costing you.
Open tool